
A Hand from the Flight-A GNT Qualifier Match
Team games are what some players consider “real bridge” because the form of scoring emphasizes making (or setting, depending on whether you are declaring or defending) the contract, rather than taking “as many tricks as possible.” Not all players share the assessment of what constitutes real bridge; nevertheless, matchpoint scoring presents the players with a moving target, whereas in teams, the target is fixed. Declarer should take the best line of play to make the contract; overtricks are not a consideration. Defense, on the other hand, should work to set the contract, even if doing so might lead to unnecessary overtricks.
Team games motivate different considerations from matchpoints during the auction, as well. The matchpoint maxim of “stay low and go plus” is overthrown in favor of “bid your games, particularly if vulnerable.” In fact, the guiding wisdom is to bid games that need some luck to make. Games with only a 40% chance of success should be bid unflinchingly, because it is the game bonus that generates the biggest rewards in your team’s score.
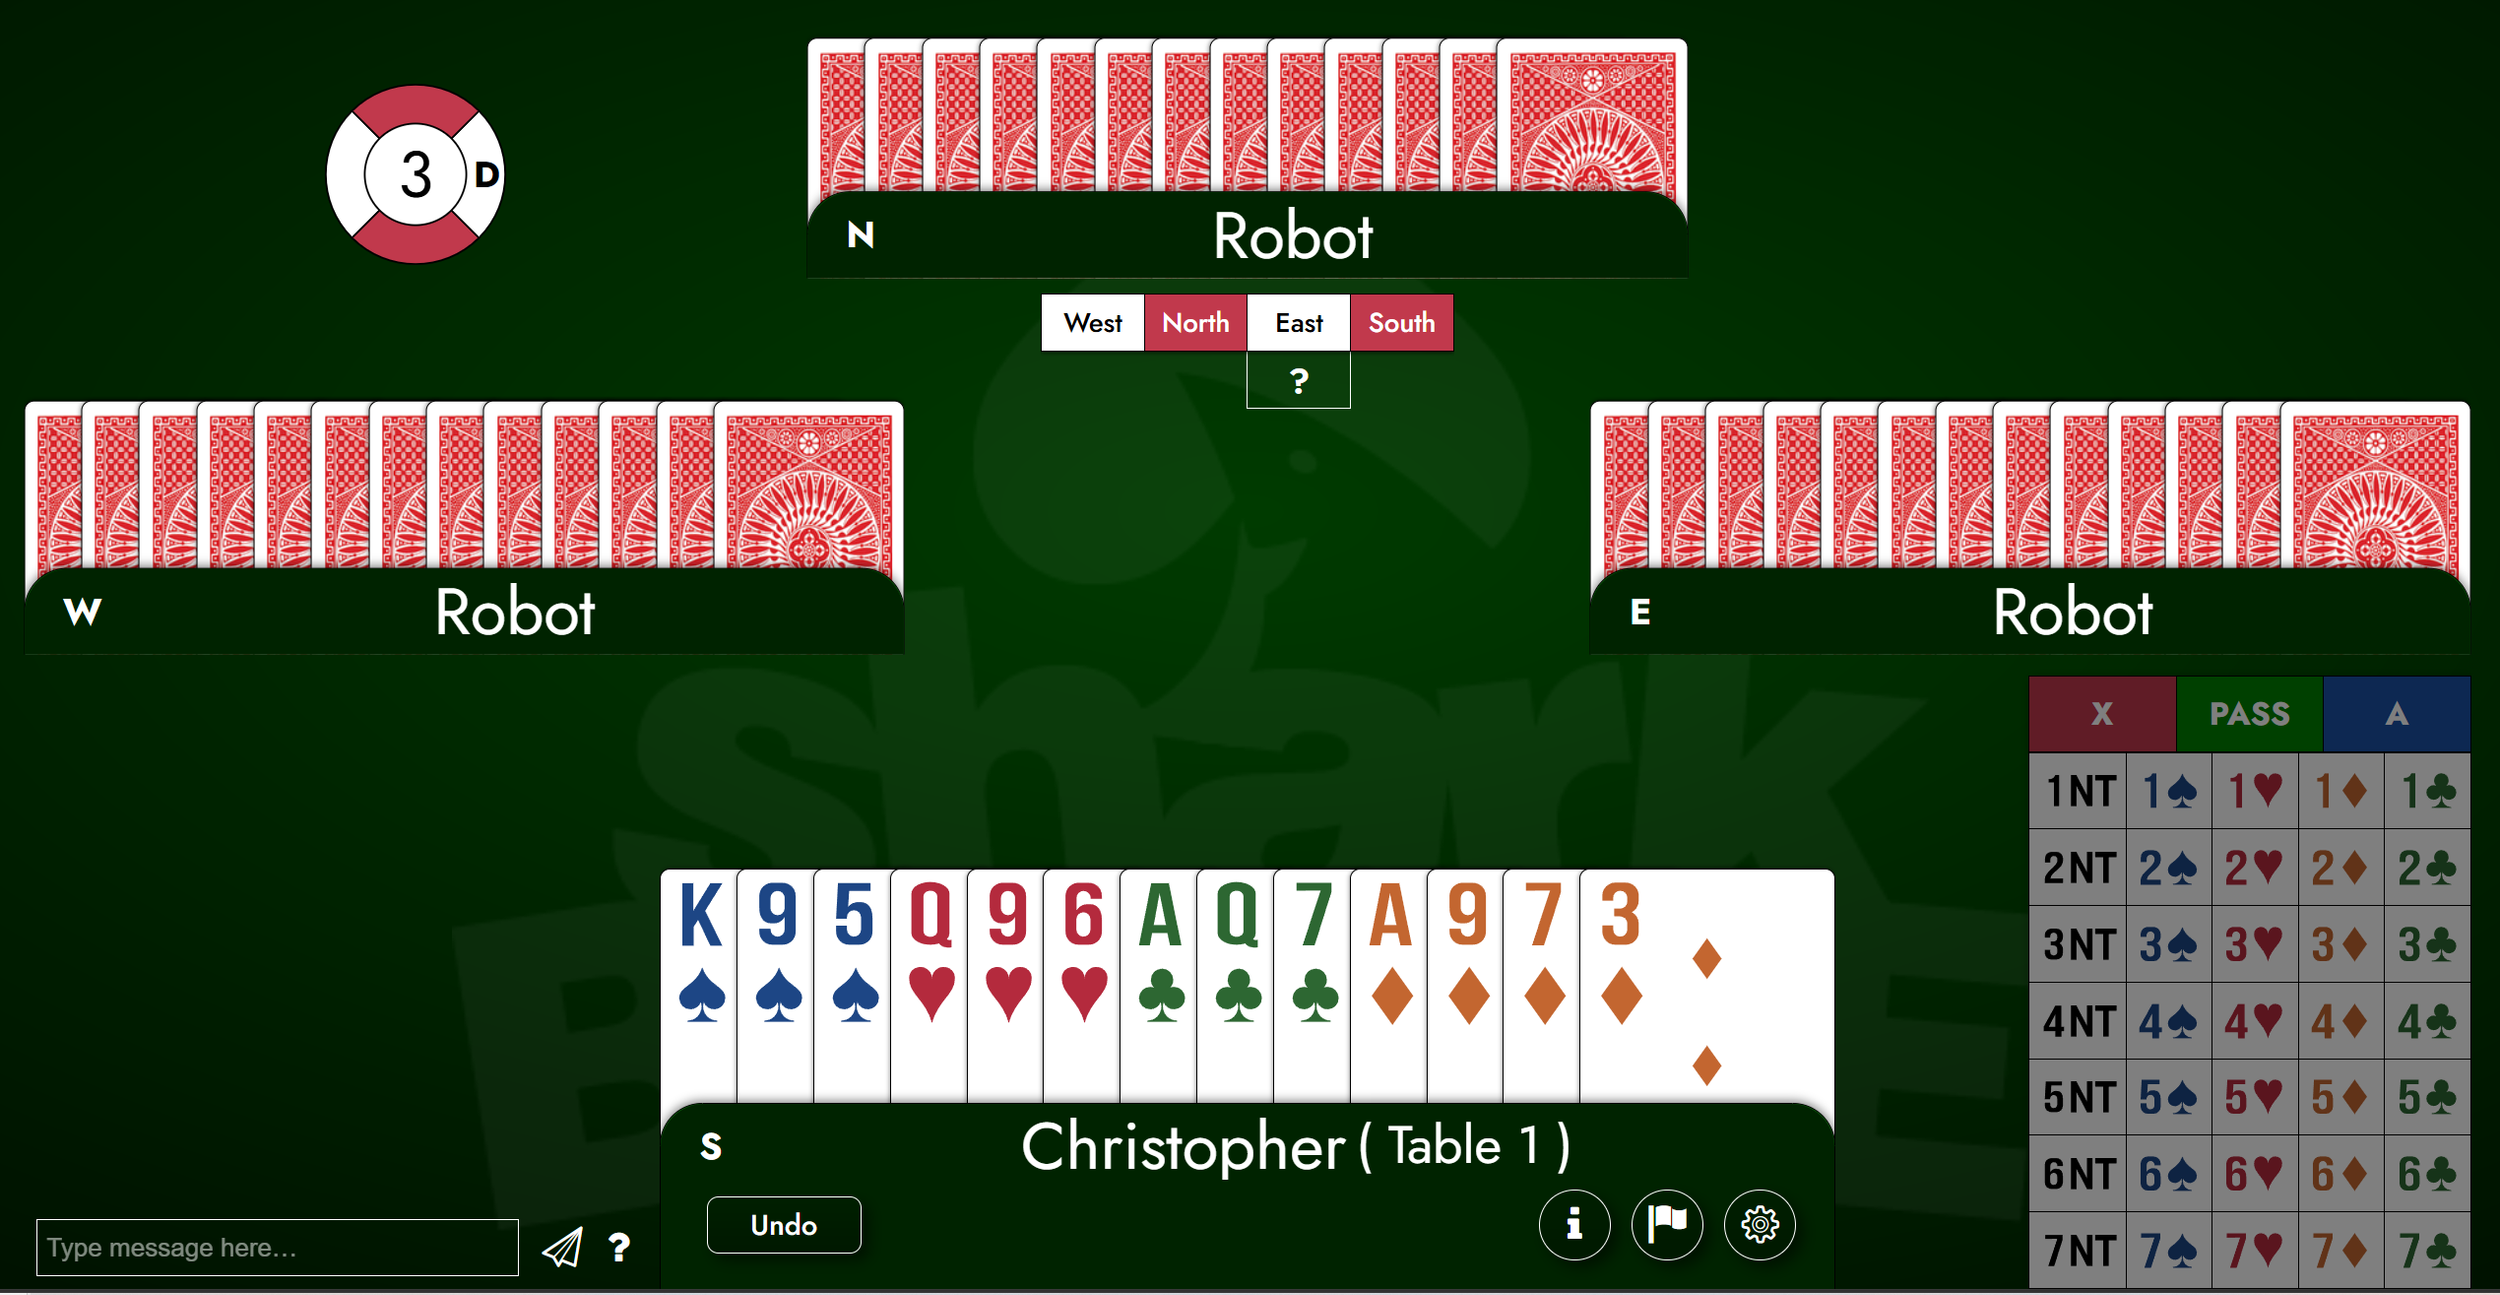
I recently played the semi-final qualifier for the Flight-A Grand National Teams. and picked up this hand on Board 3 of the 24 board match. While I was actually seated West, I have rotated the board for reading convenience.
My RHO was dealer, but passed, allowing me to open the bidding. This is a perfectly balanced 15 HCP hand. Normally, I would open 1NT, but that day I was playing with a partner who prefers a 12-14 1NT structure, so I was required by agreements to open 1♦ with this hand. My LHO doubled; my partner bid 1♥; my RHO passed, and I bid 1NT, showing a 15-17 balanced hand. My LHO now passed, and partner raised to 3NT.
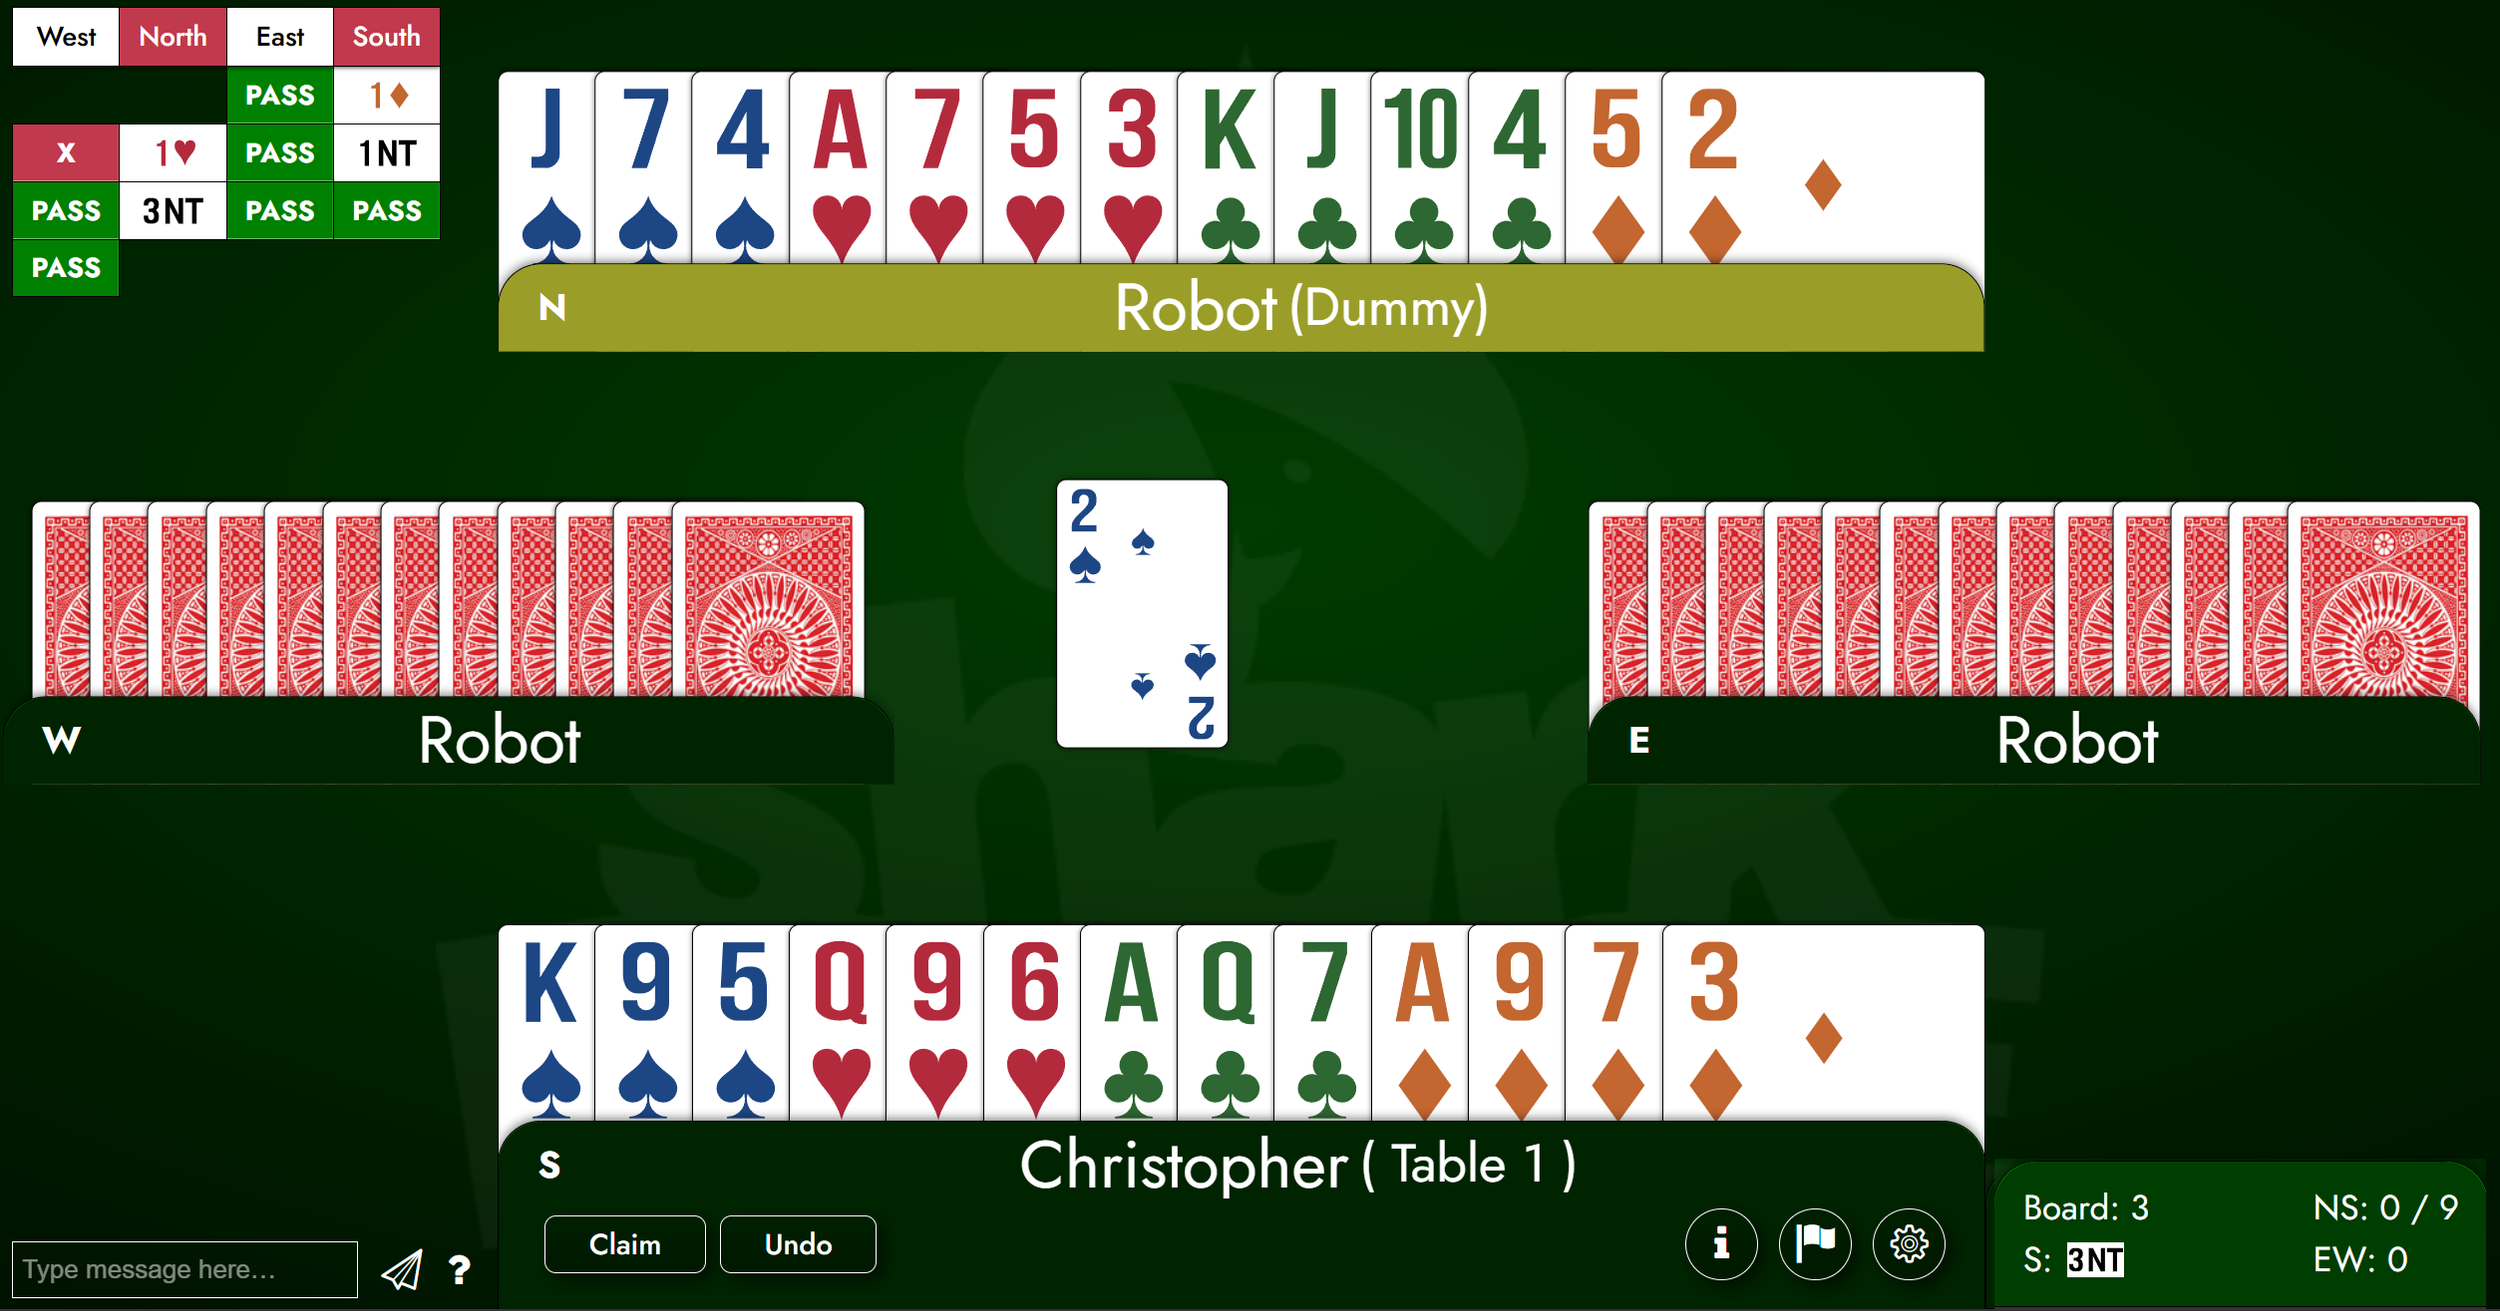
I received the lead of the ♠2, and thus was granted a view of the dummy. The lead gives me one spade winner for certain. In addition, I have one certain heart, one certain diamond, and four certain clubs, for a total of seven winners. If we were playing matchpoints, then my partner would certainly have invited game, rather than jumping to it. I, of course, would have passed any invitation. I would need to pick up only one additional trick in that case. At teams, as I have mentioned, fortune favors the bold bidders, so 3NT is not an unreasonable place to be based on the auction alone. Here I need to find two more tricks. What do you think of my chances?
Before answering that, I want to assess what I know about the hand at this moment. West has an opening hand in HCP because of their double. I also expect them to be short in diamonds. Therefore, if East has any HCP, they are likely in diamonds, and West likely has the rest. West’s lead is an honest fourth best card, because if they had held a 5-card major, they would have bid their suit instead of doubling. It seems likely that I have two, maybe three, spade losers. The missing heart honors seem poorly placed to allow me establishing a trick with my ♥Q, and I have nothing in the diamond suit. I seem destined to go down on this hand, but the truly killing lead would have been a diamond—which they did not find—so I should not give up.
What do you play at trick one from the dummy? If you chose the ♠J, you chose wisely. The ♠A and ♠Q are almost certainly in West, so playing the ♠J from dummy not only wins, but protects the ♠K in hand when you inevitably give up to West in a different suit. Another way to think about it is, if I play low and win with the King, the Jack has no later value. Ignoring all that logic, I chose poorly and called for a small spade. (I like giving myself an extra challenge?) I won the trick in hand with the King when East followed with the ♠10. Now what?
My only reasonable move is to run the clubs. Cashing my four winning clubs will give me valuable information on the exact distribution of the hand, as well as forcing the opponents to pitch cards without putting any pressure on my hand. I already know that I can pitch a losing diamond from my hand on the winning club in dummy. Accordingly, I run all four clubs, and to the first three, everyone follows. On the fourth, East throws a little diamond, as do I, as does West. I now know that West started with four spades and three clubs. West cannot have five hearts, so West either has four hearts and two diamonds, or three of each. Does this help? I’m not sure, but I’m really wishing I had played the ♠J from dummy on trick one, because now I have to lose some tricks to West, and I’d rather have ♠K9 in hand when I do than the ♠95 that I actually hold. Still, If I give up a trick to West in a red suit, and West then cashes their winning spades, that’s only four tricks. I’m not down yet.
I play the ♥3 from dummy, and East plays the ♥8; I play the ♥9. West wins the trick with the ♥J. As expected, West now plays spades from the top. On their A and Q, everyone is required to follow suit. Their last spade, the last in the deck, is the 3. I throw a little diamond from dummy, but East throws the ♥2. I toss a small diamond from my hand. West exits with the ♦Q. I play the ♦5 perforce from dummy; East plays the ♦8 and I, not wanting to concede the contract just yet, win with my ♦A.
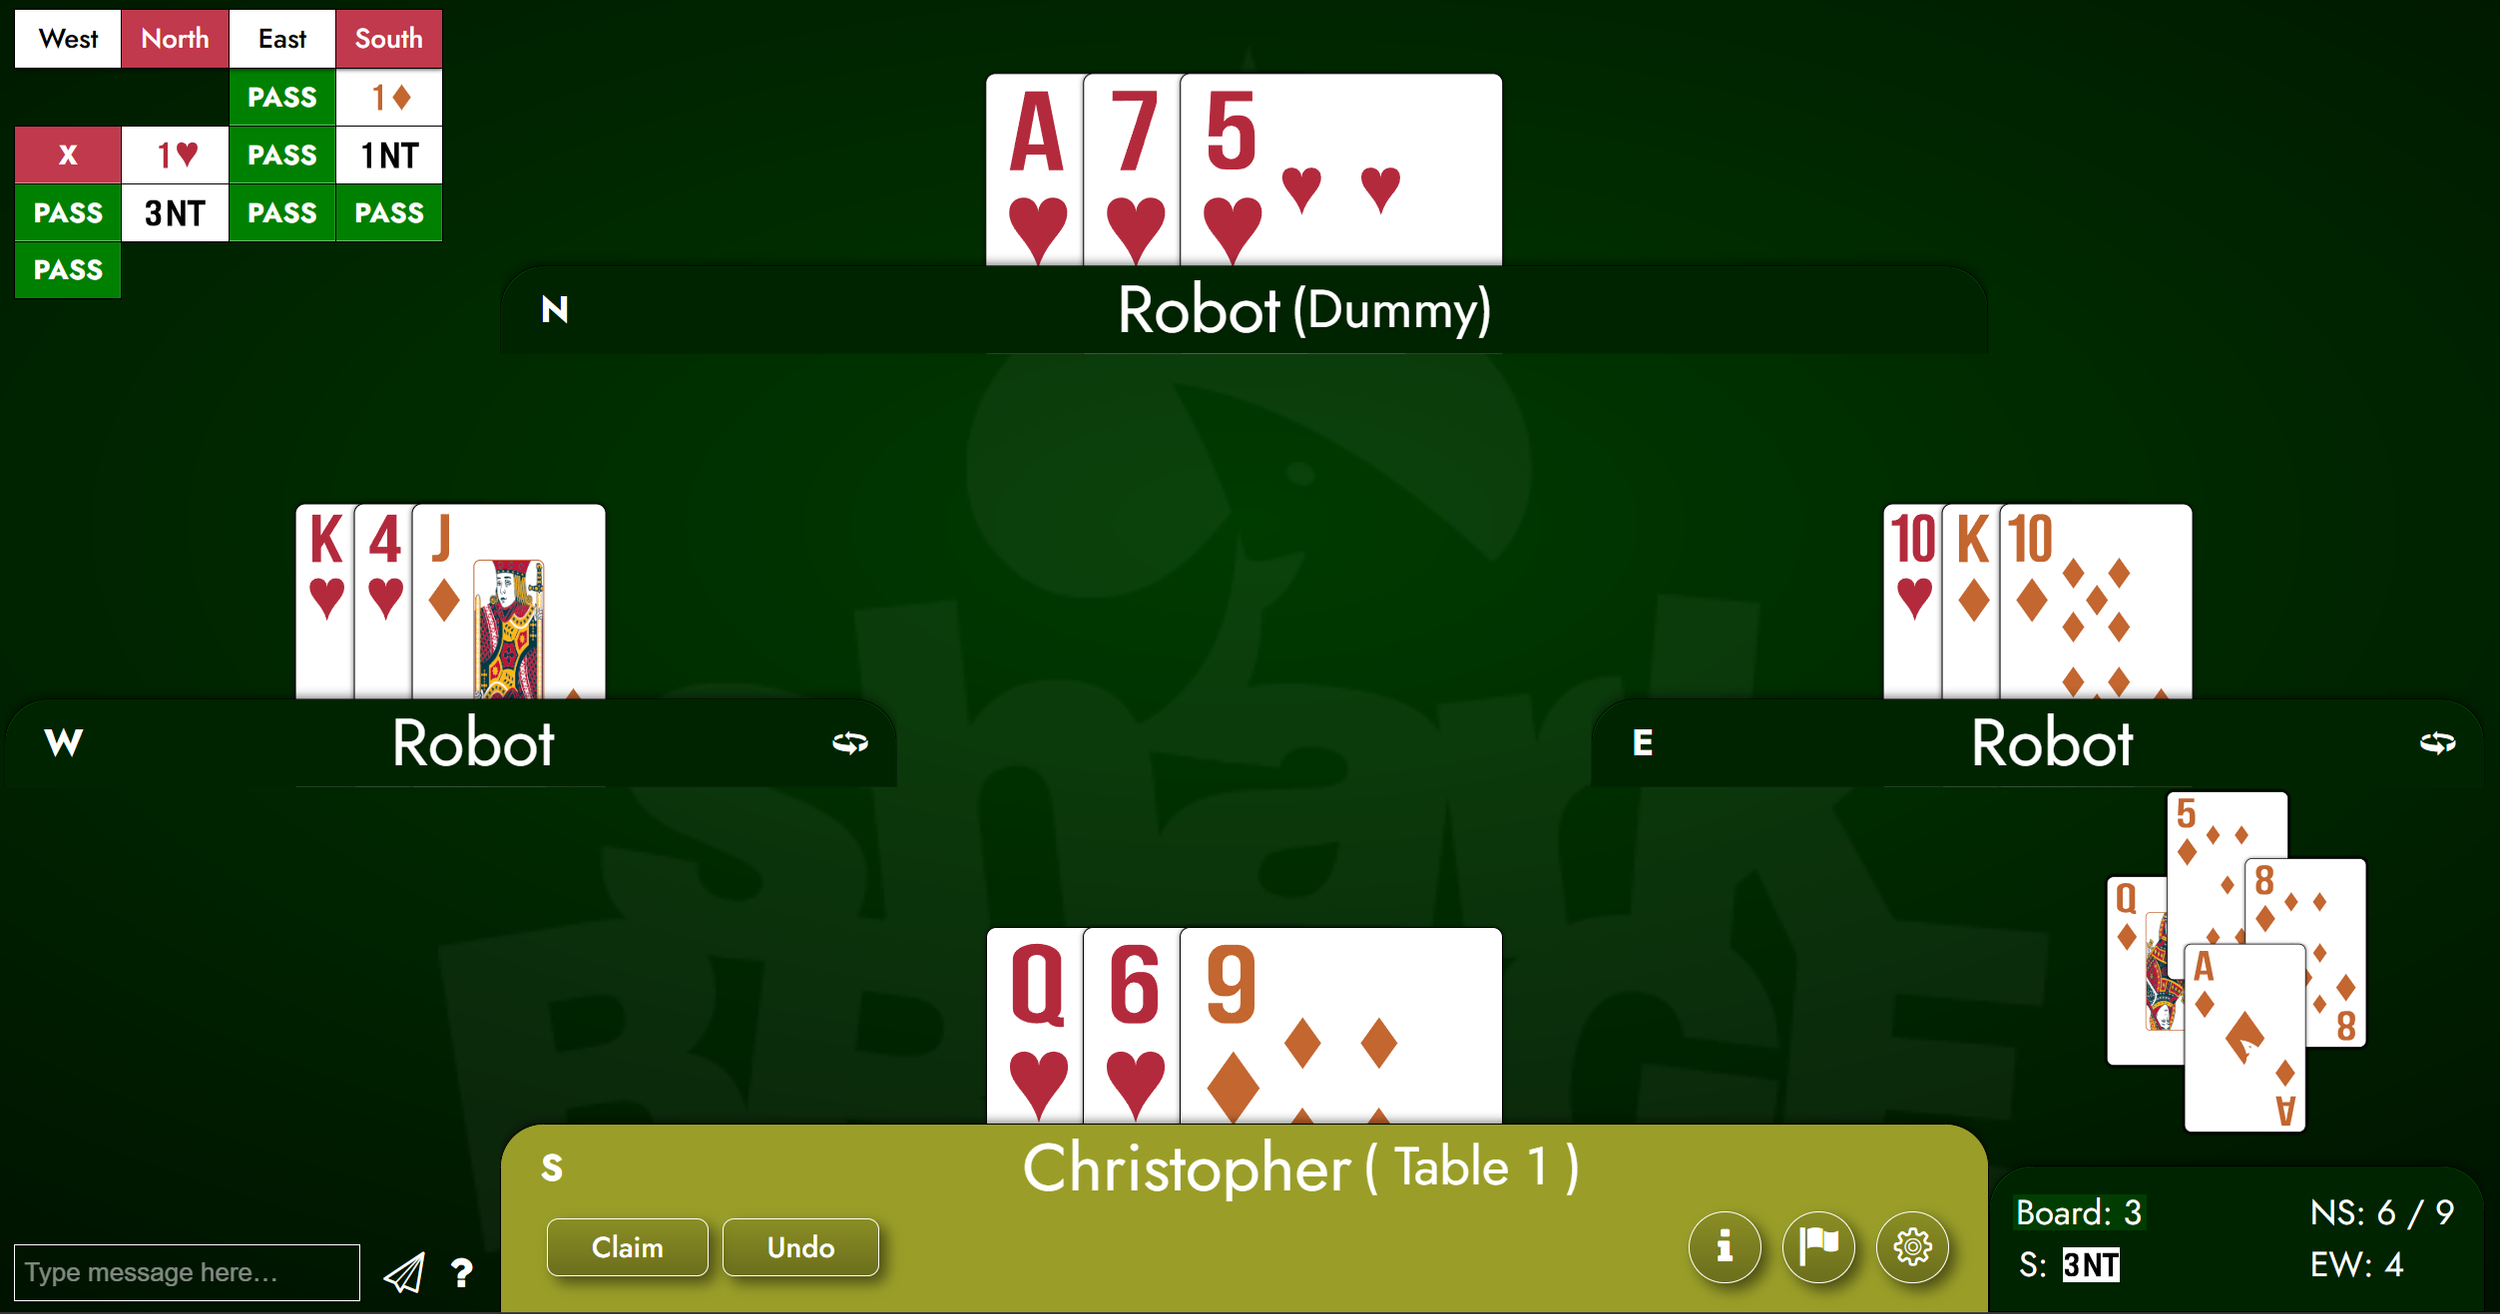
Do you see the winning play from this point? My partner has told me more than once that it is better to be lucky than good. I needed a lot of luck on this hand, including some defensive error (and they had a few difficult choices, so I am not disparaging their play). Furthermore, I played badly on trick one, which made a hard hand worse, but like a phoenix rising from its ashes, this hand may still burst into life. Dummy has the ♥A75 and I hold the ♥Q6. The opponents have already played the ♦J, ♦8, and ♦2. The only two outstanding hearts that can win tricks are the ♥K and ♥10. If I can get the opponents to play those two cards under my ♦A, then I have the rest of the tricks. The opponents won’t give up voluntarily, and there’s nothing I can do if one opponent holds both cards, so I have to play for a specific condition.
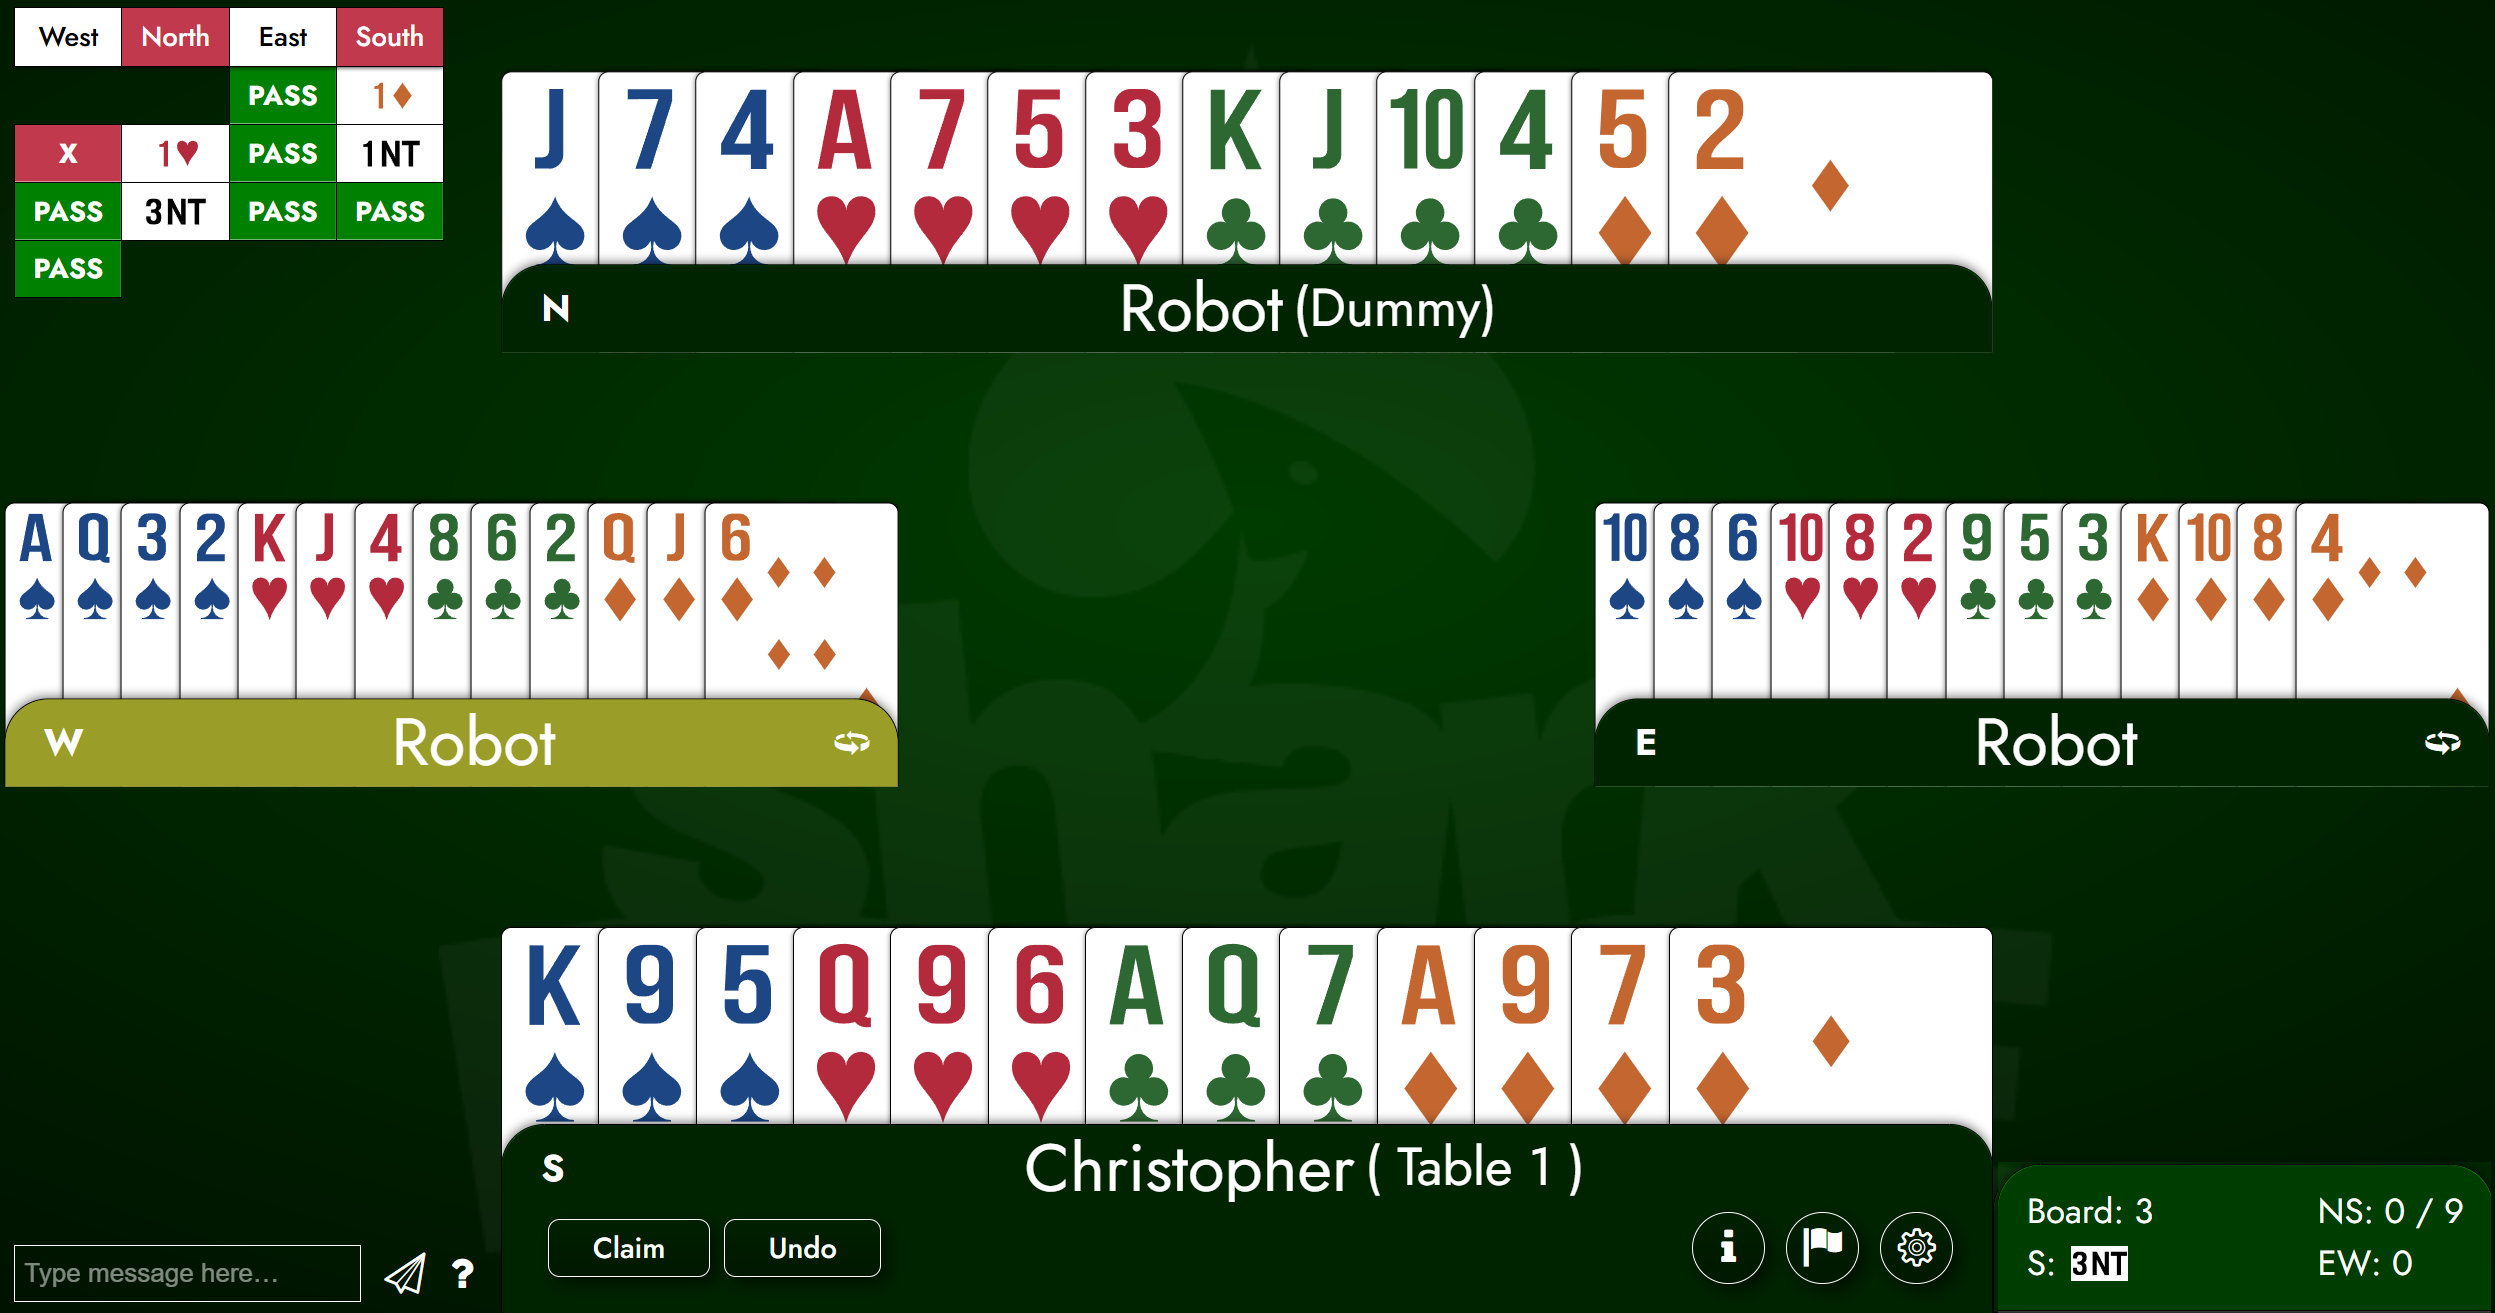
If the hearts were 3-3 from the start, and East held the 10, then it is now singleton. (Position above; East has already played the 2 and 8.) West almost certainly has the ♥K given his initial double in the auction, but I need to play for that condition, anyway. By leading my ♥Q from hand, I can “pin” the ♥10 in East (East is forced to play that card, because it is singleton, and it cannot win against my Q), while simultaneously giving West a losing choice: West can play their remaining small heart, and allow my Q to win, or they can cover with their K, forcing me to win with the A in dummy, but promoting all my smaller hearts to winners. In the actual event, West chose to cover (but not covering would not have won for them), and I did capture both the ♥K and ♥10 in one trick to claim nine tricks in the end. The full deal is to the right.
As you can see, 3NT is impossible to make on the actual lie of the cards without help from the defense. Even in the end, If East had kept a heart and instead thrown a diamond on West’s run of winning spades, I could not have made the hand. As my partner in this event said, “it is better to be lucky than good.” Better declarers than I might have gone down on this hand. May they rest happy, if envious.